Pages

Wednesday, October 29, 2008

Menu Planning and CONTEST

Today's topic, menu planning, is really all about getting yourself organized to cook. Do you ever hear yourself saying, "I don't know what to make for dinner!"? You are not alone, especially if you hear yourself saying this about 30 minutes before everyone expects to sit down to a meal. So, half of the battle is to decide, in advance, what you are going to make for your evening meal.

  • First, select a menu planning template from off of the internet. I found a cute one on http://www.futuregirl.com/ that you can download for free. If I could show it here, I would. If only I was techno-savy...sigh! Or, Google menu planning template for more free options. You can also just get some paper; draw a line down the middle. Make 6 vertical lines across the paper as shown on the picture.


  • Second, make a list of meals that your family enjoys. Ask your family to help you make the list. You will be surprised with what everyone comes up with! At this point I consider what I might need to use up that I have on hand. I also consider what is on sale at the grocery store.
  • Third, fill in the left hand column with each dinner menu.
  • Fourth, create your shopping list from the meals you have planned, along with other staple items you might need. I keep my shopping list where everyone can see it, so that if they see we are out of something, they write it down. Click on the picture below for a close-up. You'll notice I only plan dinner. For me, breakfast and lunch items are easy and I always have those items on hand. You may want to plan all of your meals.
Do you have a favorite menu planning template? I’d love to hear what you do that makes menu planning fun for you. While we are at it, it is time for a contest. Just make a comment on this post, and I will be giving away a fun menu planning, recipe package. Share this with your friends or on your blog.

Monday, October 27, 2008

Pasta with Beet Greens and Raisins

I found this wonderful recipe on http://www.myrecipes.com/ ...and it is from Cooking Light. I thought I'd give it a spin, because I had some baby beets with attached beet greens. I knew I'd be roasting the beets, but wanted to also use the beet greens. So, here are the ingredients:

8 oz uncooked mini Penne pasta
1/4 c. raisins
1 1/2 TBSP Olive Oil
2 c. coarsely chopped beet greens
2 tsp bottled, minced garlic
3 c. toasted slivered almonds
salt and pepper to taste
Note here....I didn't read that the almonds were to be toasted...so mine weren't and it still tasted great. The raisins I have on hand I got in huge bags at Costco and are so moist and plump that I couldn't help but graze on a few while I was cooking. They are also organic. I used fresh garlic cloves because I had them on hand and want to use them before they become dried up and yucky.

Above is a picture of where I have cut off the stems to the beet greens. Then, roughly chop the beet greens. Get out a good sized frying pan, heat the oil then add the minced garlic and greens. Cook until wilted.

In a separate pot, cook the penne pasta. While that is cooking, add some hot water to the raisins and let soak for about 5-10 minutes, then drain off the water. Once everything is ready, drain the water from the pasta, add all of the ingredients together and mix until everything is equally distributed.
This is such a delicious dish. I served it with roasted chicken and sauteed beets. I only have a little chicken left....pasta is all gone. Try this! I think you'll have a new recipe for your files that you will want to make again and again.

Saturday, October 25, 2008

Potato Tortillas from food storage

Behold, the can of instant potatoes from my food storage. I am partial to fresh peeled potatoes being used to make mashed potatoes. I guess that is why I still have a bunch of cans of instant potatoes! I have used instant potatoes to make bread before, so I thought I'd try out the recipe for Potato Tortillas in my cookbook, Gourmet Tortillas by Karen Howarth. These are delicious, and yet another way you can use and rotate your food storage.

In addition to the instant potatoes (use any kind of mashed potatoes for this recipe), you will need flour, baking powder, salt and butter.
I start out with the mashed potatoes in a glass measuring cup. You need 1/2 c. potatoes (prepared), then add water to yield 7 ounces (nearly 1c.). Next, in another bowl, put 1 1/2 TBSP softened butter. If you need to microwave it to soften it, do it in 10 second intervals. In this same bowl, add 2 1/2 c. white flour, 1 tsp. salt, and 1 1/2 tsp baking powder. Then, cut the butter into the dry ingredients until the flour resembles coarse meal. This distributes the butter throughout the flour, which gives you a uniform product. If you don't have a tool for this, just use 2 dinner knives, and cut through the entire mixture with the knives going from the center to the edge of the bowl, in opposite directions.


Next, add the mashed potato/water mixture and mix well. You want a soft ball of dough. If you have a bunch of leftover dry ingredients in the bottom of the bowl, removed the ball of dough, then add a little bit of water to moisten the remainder. When it is a soft dough, gently knead it into the main ball of dough.
Once you have the ball of dough, cut it into 8 pieces with a serrated knife, as shown below.


Take these pieces, shaping into small balls of dough, and slightly flatten the top. Cover these with a dishtowel and let rest for 15 minutes.
Heat up your cast iron skillet (or frying pan), and begin rolling out one ball of dough at a time. Each tortilla should be about 8 inches in diameter. You can check your first one with a ruler if you want.

Carefully lift the uncooked tortilla onto the skillet, and let it cook (while you being to roll out the next ball of dough) for about a minute on low to medium. When bubbles appear on the top, it is about time to turn the tortilla over.


The tortilla should be lightly browned. When you are finished rolling out the second tortilla , it will be time to take this one off of the skillet and put it on the cooling rack.


Doesn't that look delicious? I thought so, so I put a little butter on it and ate it while I finished cooking the rest. All of the time I was doing this, I was on the phone with one of my BFF's, Cindy Lou. See, it isn't that hard!


After you cook each one, just stack it on top of the previous one on your cooking rack. When they are all cooked, let them cool for 5 minutes, and put them in a ziplock bag (I used a bread bag because I am out of gallon sized ziplock bags). You can store these in the freezer, or in the fridge or just leave them on the counter top for up to one week. Enjoy!!

Friday, October 24, 2008

Food Storage Friday 10/24/08

I made the ultimate sacrifice of my dignity this morning, and decided to share my food storage areas with you. Yes, it looks a bit disorganized. We moved into this house a couple of months ago, and I'm still getting everything where it belongs.

The first two pictures are of some of my storage in a closet in the extra bedroom. I have several buckets of wheat, barley and oats. I also have cases of chicken chunks and the tomato soup I mentioned in a previous post. I also have #10 cans of dehydrated foods such as apple slices, pudding, potato pearls and other items. You'll notice that the boxes have been labeled several times. I need to go into the boxes and re-label them with the correct contents. I always reuse the boxes.

The next two pictures are of the items I purchased this week. I got the rice at Costco, and the other items at the LDS dry pack cannery. I have an appointment to get a dry pack canner in a week, and will be packing the food into the #10 cans then. You'll notice the can lids and oxypacks on top of the box. The oxypacks keep the food fresher for much longer. When packed properly, studies have shown that grains and powdered milk will keep up to 30 years. There will be some loss of nutrition, but the food will still sustain life.

On the picture below, you'll notice that I have a case of pinto beans and a case of hard red wheat. I decided to go ahead and get them already packed in the #10 cans. The cost was only 50 cents more than if I would have done them myself. A bargain! At the LDS dry pack cannery, there are certain items that you can pick up that have already been packed in the #10 cans. You do not have to be a member of The Church of Jesus Christ of Latter-day Saints to purchase at the cannery.

Below are pictures of my pantry. I have organized and reorganized this pantry, so don't be too critical! I tend to purchase bulk amounts when items are on sale and when I have a coupon for the item. I got all of the electrosol dish washer detergent for free this way. I got the liquid dish detergent for $0.25 cents per bottle on sale with a coupon for each bottle. If my pantry looks kind of wacky that way, this is the reason for it.

The Malt-o-Meal cereal on the top shelf was all free after coupon, too. Sometimes I get items I wouldn't normally purchase, but since they are such a good deal (like FREE) after coupons, I get them. If I really won't use them, they go to a family in need, or to the food bank.


The buckets in the pictures below have orange lids. This are gamma lids, and allow you to easily access the food in the bucket buy twisting the lid off. I'll show this in another post.

Well, there you have it! I have a three month supply of food we would normally eat (some not pictured and some in the freezer) and will have my 1 year supply (again) after Honeyville Grain delivers the last of what I ordered. It really wasn't difficult. Feel free to ask questions in the comment section or email me at thelittleredhenfoodsite@live.com For more information on storing food, go to http://www.providentliving.org/

Wednesday, October 22, 2008

Oatmeal tutorial and the Marga flaker

Want to start your day with a delicious bowl of oatmeal? Try flaking your own groats! Pictured below is my breakfast this morning, and it took all of 7 or 8 minutes to make. I love putting a bit of brown sugar and raisins on my oatmeal, but topping oatmeal with applesauce sprinkled with cinnamon is another yummy option.

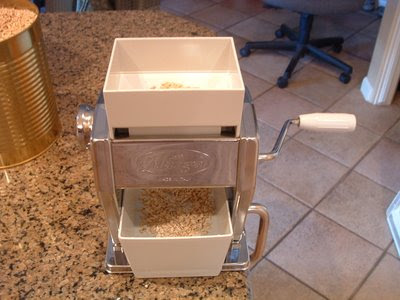
My friend Holly has a roller/flaker, and has convinced me that I needed one also. Yes, she was right on! Now I'm going to convince you that you need one, too! This is a flaker made by an Italian company, called the Marga. I paid $89 for mine at a local food storage store (they sell dehydrated foods in #10 cans, grains, appliances, etc).

You put the groats (oat grain) in the hopper, set it on 3 (to flake) and turn the handle. In 30 seconds or less, you have freshly flaked oats. The picture below is of groats in the hopper.

I wanted you to see what it looks like once it is flaked....click on the picture for a closer look. This is the amount of flaked groats just after a few turns of the handle.


I ran some back through on setting 1 to make instant oatmeal just so you can see. When groats are processed, the finer the grind, the quicker it cooks. Above would be the 5 minute cooking oats (which is my preference) and below would be the quick cooking oats, which would take 1-2 minutes to cook. If you process it further, it would be instant.

When you cook any grain, you use one part grain to 2 parts of water. So, for 1/2 c. flaked oats I used 1 c. water. If you like it thinner, just add a little more water, or add milk when you serve it.


Hopefully this has given you a little more knowledge about oats. Steel cut oats are groats that have actually been cut with steel blades. It is really delicious, too, you just can't do it at home. For the family that wants to store grains for their 1 year supply of food, groats and a roller/flaker is really a great idea. The nutritional value in the grain is preserved by waiting to process it just before using it. By the way, you can flake wheat, barley, etc. with the Marga.

Tuesday, October 21, 2008

Disneyland and Mission Tortillas / Boudin Sourdough Bread

We had a family weekend at Disneyland just last weekend and had a great time. My idea of a great time and that of my DH and DS's is just a bit different. We ran from attraction to attraction as a family most of the time, but when we were in California Adventure, we parted ways for a time. They wanted to ride the Tower of Terror (I think that is what it is called), so I made my way over to the Mission Tortilla Tour. I am a huge Mission Tortilla fan. If I'm not making my own tortillas, I usually buy this brand.

I'm not sure exactly what the equipment is in the first picture, but below is where the dough pieces go down the conveyor belt from the right, and are flattened into tortillas in the press (middle). You can click on the picture to see this close up.


Next, they are heated, and then, they are cooled on the conveyor belt (left).

After they come off of the belt, a nice Mission Tortilla employee hands you a freshly made tortilla....yummy!
They have a person that also shows you a variety of ways to use their product. They had recipe cards to take also.

Boudin Sourdough Bakery tour was right across the way. I went through that tour also. I didn't get pictures....sorry! I was too busy juggling my bag, backpack and half eaten tortilla. If you do go to California Adventure, you'll have to take these tours. You won't be disappointed!
Oh, by the way, I have actually ordered some of Boudin's sourdough bread. They have some cool stuff through mail order. This makes a great gift also! http://www.boudinbakery.com/

Thursday, October 16, 2008

Garlic and Ginger in a tube!

I thought I'd introduce you to one of my favorite cooking items, Gourmet Garden Ginger and Garlic. They carry other items in a tube also, but these are my favorite! Whenever I am cooking and need some garlic or ginger, I just get the tube out of the fridge, squirt some into the pan or bowl, and that is that! Instant flavor without the mess. Now, usually I use fresh garlic or ginger, but there are times that I am out, so this is great to have on hand. Also, when it gets close to the expiration date, I just put the tubes in the freezer. I don't even have to defrost it as it is soft enough to squeeze out straight from the freezer. Great stuff. Wonderful flavor.

You can find this in the produce section of your grocery store, usually near the fresh herbs. If you can't find it, ask your produce person...they can order it for you!

Tuesday, October 14, 2008

Tomato Soup: What is it good for?

Tomato soup....what can I say....not my favorite! So, you might just wonder why in the world I have 3 cases of this stuff. Well, I had volunteered at the LDS cannery in Lindon, Utah one afternoon, and at the end of my shift, I was given the opportunity to buy up to 3 cases of tomato soup. The price was right, and my food storage needed some extra items so, I caved in and bought it. I actually served it one night to my family, with grilled cheese sandwiches. Unfortunately, DH was the only one to eat it (he'll eat just about anything because he was taught not to waste food). So, I still have all of this tomato soup, sitting in my pantry and food storage closet.

Sunday afternoon, I was browning the ground beef for our spaghetti sauce. I reached into the pantry for tomato paste or sauce and came up empty. It was then that I glanced over at the tomato soup. I bit my lip. Could I? Should I? Well, you know, I took that can out of the pantry, opened it, and put it into the cooked ground beef. I added water. I then added uncooked barley. I added Italian Seasoning. I stirred constantly while the sauce simmered. I added more water as I waited for the spaghetti to cook. And you know what? It looked great, smelled great and I served it right up. Everyone dug in and said it was delicious!! Awesome!

So, what else can you make with tomato soup? Thank goodness for google! I found a couple of great recipes for cake using tomato soup on http://www.cooks.com/ along with a chili recipe using tomato soup. We aren't big chili fans, but I am sure that I can find some other recipes if I take some time. I'll try out the tomato soup cake recipe next week and give you a report.

What do you make using tomato soup? Any favorite recipes? I feel another contest coming on....

Monday, October 13, 2008

CONTEST! Favorite Kitchen tools!

This is just a reminder to enter my contest for silicon muffin liners and potentially a cookie dough scoop. Just go read my blog entry from Wednesday and make a comment about your favorite kitchen tool or favorite muffin recipe. I will randomly select the winner using an online number selector. I need 15 comments on that post to include the dough scoop....what are you waiting for...call all of your friends!!!

Saturday, October 11, 2008

Farmer's Market Report October 11, 2008

What a wonderful farmer's market today! It was very cool, mid 50's this morning (cold front coming through the state today) and the vendors all were wearing their northface fleece jackets and beanies, lol! I kept procrastinating my trip out today, so ended up with about 15 minutes to check everything out. These vendors do pack up right at noon, if not a little bit before. There was a great crowd out today though.

As you can see (click on picture to make it bigger), I bought lettuce greens, cherry tomatoes, a small lemon cucumber, peaches, beets with greens still attached, 2 good sized spaghetti squash and some artisan raw cheese. Below is a picture of all of the cheeses they (Finney Farm Home Dairy) offer.


I purchased some basil pesto...uuummmm...yummy, and some feta. I am usually not a huge proponent of raw milk or cheese, but this was really delicious.


Here is a picture (below) of the middle of ancestor square, where the farmer's market is held. The growers are around the grass area on the sidewalks selling their produce/homemade items. Everyone was nearly packed up to go home, but during the market time, there is usually someone there playing some type of music.


The St. George Farmer's Market only goes until November and I am going to enjoy as many more of my Saturday mornings there that I can. Did you go to your farmer's market today? Please comment and put a link to your post.

Friday, October 10, 2008

Chicken Salad Sandwich * Food Storage Friday

My friends all know that I am dedicated when it comes to food storage. So, I've decided to devote Friday to food storage posts. You might find them on another day of the week, but Fridays will always have a food storage post. To get us started, here is one of my favorites, chicken salad.

Ingredients:

12.5 oz can chicken
1 c. cashews
1 c. grapes, cut in half
1/2 tsp. Hidden Valley Ranch dressing (in foil package)
1/2 - 1 c. mayo or miracle whip
broccoli sprouts


Drain the water from the can of chicken, put in a bowl and mush up a bit with a fork. Add the mayo, grapes, dressing powder and cashews and gently stir around until mixed in. If you are making this for later, add the cashews before serving. (note: I got the HV ranch hint from my friend, Susan S.)

This is really delicious on whole wheat bread with broccoli sprouts as shown below. It is equally as yummy on a croissant or on a bed of lettuce.
Yep, I ate this very sandwich for lunch and yes, it was good. I had it with a glass of limeade with a bit of blueberry Naked Juice stirred in.


If you try this recipe, and decide that it is a keeper, put the ingredients into your food storage. For example, if you will make this recipe once a month, you will need 3 times the recipe for your 3 month storage:

3 cans of chicken, 1 1/2 to 3 c. mayo or miracle whip, 3 cups of cashews, broccoli seeds for sprouting, 1 package of Hidden Valley Ranch dressing in the foil package. You can't store fresh grapes, but in a pinch, this could be served without the grapes, maybe substitute apple or celery.
If you are into sprouting your own sprouts, make sure that you get seeds for this purpose. Visit www.sproutshop.net  for great sprouting seed, microgreens kits and sprouters.

Thursday, October 9, 2008

Oatmeal Raisin Spice Muffins

This is the recipe I made yesterday...the pictures are in the previous post. I got this recipe from a magazine 20 years ago (sorry, don't know which one) and we just love it! Just a note, I used lemon yogurt instead of buttermilk, left out the raisins (I improvise a lot when I cook and bake...and it usually turns out great) and the muffins are fantastic.

Oatmeal Raisin Spice Muffins

1 1/2 c. AP flour
3/4 c. sugar
2 1/2 tsp baking powder
1/2 tsp salt
1/2 tsp ground cinnamon
1/4 tsp ground allspice
1/8 tsp ground nutmeg
3/4 c. raisins
2 eggs
1 1/2 c. buttermilk
1 c. regular oats
1/3 c. butter, melted

Preheat oven to 400* Combine dry ingredients into a large bowl. In another bowl, combine eggs, buttermilk and oats until well blended. Let stand 5 minutes. Add egg mixture along with melted butter to flour mixture and stir until just blended.

Turn into 12 greased muffin pan cups (or use silicon muffin cups...see previous post...they don't need to be greased by the way). Sprinkle with additional rolled oats if desired. Bake 16 to 20 minutes or until a wooden pick inserted in the center comes out clean. Makes 12 muffins. 170 calories.

Food Storage note: This is a great recipe to use your food storage with. You can use powdered buttermilk (just add the correct amount of water) and powdered eggs for that matter. Just remember, that the oats must "sit" in the eggs and buttermilk where they become moist...this is what makes these muffins so delicious. Let me know how how you like the recipe!

Wednesday, October 8, 2008

CONTEST! Favorite Kitchen tools!

I love cooking and baking, and over time have discovered some neat tools to use that make the job easier. The first tool to talk about is the handy cookie dough ball scoop. You can get these inexpensively at Bed, Bath and Beyond (under $5) and other stores that carry kitchen utensils. The cool thing about the dough scoop is that you get a uniform cookie every time. It was tough getting these pictures, because I'm right handed, so if it looks a bit funny...sorry! You scoop the dough into the scooper, level it off on the bottom, then push the top outside of the scoop (it is flexible which enables the dough to come out easily) with your thumb. Here is the finished product, yummy chocolate swirl cookies. See how nice they look?
My next favorite product is the silicon muffin baking cup. I love these....so easy to use and to clean. Gone are the days when you have to grease and flour muffin tins, or hope you have paper cupcake liners in your cupboard.

I made some oatmeal muffins (after I finished baking the cookies) to demonstrate. Above the dough is in the cups. Notice you don't have to have these in a muffin tin. They stand up on their own without the need of a tin.

Here is the finished product.....so good......so easy.....everyone needs some of these if you bake your own muffins. I just pushed the muffin out after they came out of the oven. They come out nicely with little stuck to the sides when hot or cooled. They wash easily. I just put them upside down on a dish towel to dry. Stack to store. You can get the silicon muffin cups in a variety of sizes and shapes. I got these particular ones in Target. They were $1 for a container of 6, which is a great deal. I have seen them in TJ Maxx for about $5 for 6. They had larger cups and some square ones, too.


OK, the contest is this.......leave me a comment on my blog...this thread (yes, please do tell your friends to share!) telling me a favorite kitchen tool that you like to use, or a recipe for a favorite muffin recipe. I will send you 12 silicon muffin cups! If I get more than 15 comments, I will include a cookie dough scoop! How fun! Yes, if you are from outside of the US, I will try and ship to you also, or send you a Betty Crocker recipe pamphlet! Contest ends on Tuesday Oct.14th, 2008 at 12 noon MST.


Tomorrow I will post the oatmeal muffin recipe. It uses yogurt!