Monday, December 22, 2008

Freezing Surplus Holiday Treats

If your family is like my family, you are receiving many delicious treats for the holidays from friends and neighbors. You might feel a bit overwhelmed by the number of cookies, candy, crackers, dips, etc. that are coming in your door. Don't fear! I'm going to give you a few ideas to help you use what you receive, and not let anything go to waste.

In the picture I have here, there are caramels, cookies, mustard, beef salami, olives, 3 different types of crackers, etc. Here is what I'm going to do with some of the items:


  1. Crackers: If they are still in an airtight bag, you can freeze them. Just pop the bag into the freezer, and when you pull them out, they will be as fresh as the day you put them in. I am going to put them in a ziploc bag, crush them with a rolling pin, and put them into a freezer bag and use them as a crumb topping on a casserole.

  2. Cookies: Cookies do very well frozen also. You can also put cookies into a ziploc bag and crush them. Use the crushed cookies in shakes, when making a pie crust instead of the graham crackers or to top pudding.

  3. Candy: Chop up the candy and mix into ice cream. This is why you pay the big bucks at Cold Stone, and other ice cream shops. You can also make a cookie dough, put teaspoonfuls into greased mini muffin tins and bake at 350* F for 12-15 minutes. Take out of oven and immediately push a piece of candy into each cookie. Let cool, then ease out of the tin.

  4. Nuts: put into ziploc bags and into the refrigerator until ready to use.

I am not sure if I am going to use my beef salami or donate it. I will use the olives and mustard for sure.

Did you receive a food item that you are not sure how to use? Post a comment and I'll try and help you out!

Monday, December 15, 2008

What's new in the kitchen? Blend It Up Southwest Spice Blend CONTEST

If you've been reading my blog, you know that I love my VitaMix. I've had it for 20+ years and use it 3-4 times a week. I was at Costco a few weeks ago when they were doing VitaMix demonstrations. While making a taco soup, they used a spice blend made by Blend It Up. Anyway, I really liked the flavor of the soup, so, I bought the Blend It Up Southwest Spice Blend.
You can imagine my excitement, when I met the person who produces Blend It Up! Here is the exciting part......... he has given me some product for a contest!


I will be giving away 3 containers of Southwest Spice Blend from Blend It Up. Here's what you need to do; make a comment on this post telling me your favorite southwest food. I will take comments until Saturday Dec. 20, 2008 at 12 noon MST. I'll use random.org to select my winning numbers. Tell all of your friends to enter!

Also, if you make an order with Blend It Up (click here and it will take you to their web site), mention the Little Red Hen, and you will receive a gift! What is not to love about that!

Saturday, December 13, 2008

Homemade Italian Wedding Soup Recipe

I've had this recipe for Italian Wedding Soup now for some time. I'm not sure where I got it, but it is made in a pressure cooker. You can prepare it in a soup pot, it will just take longer to cook. Personally, I like to have a pot of soup simmering on the stove on a winter day. It makes the place feel homey! By the way, I did use my pressure cooker, and it turned out great.

So, let's get started! The recipe called for 3/4 pound of ground beef. I used a pound of ground turkey meat. Add one egg, 2 TB of Parmesan cheese, grated, 1 tsp oregano, 1 1/2 tsp minced garlic (I used garlic in the tube...that's the squiggle in the front right), 1/2 tsp salt and 1/4 tsp pepper.
Mix all of the above together with your hands. You can use disposable gloves for this step; I hate getting my hands gooey. Set the bowl aside and proceed to the "broth" portion.

Dice one yellow onion and add this to your pot or pressure cooker with 1 TB of olive oil. Saute until onions are translucent.

Next, add 8 cups of chicken broth. This is 2 containers of ready made broth. Or, if you have your own homemade chicken stock, use that.

Add 1/2 c. orzo pasta or other small pasta., 1 TBSP of Italian herbs, and 3 carrots, diced. Below is a picture of some orzo. I got mine at Whole Foods when I was in Las Vegas. I love that store!

Next, while the ingredients are simmering in the pot, begin making your meatballs. I used a melon scoop. The meatballs should be smallish, so I thought the melon ball scoup was the perfect size. I kind of scooped with the tool, then packed it with my other hand. Gently drop these into the simmering pot until you have made up all of the meatballs.

Add 1 pound of spinach to the pot, then shut your pressure cooker, and let it cook for 1 minute.
Release the steam, and slowly take off the lid. I served this with freshly grated Parmesan cheese. We had some ciabatta rolls, and I made turkey with provolone cheese sandwiches. Some dear friends came in from out of town for a very quick visit, and we enjoyed the soup together.

This is such a healthy, delicious soup. Hope that you enjoy it! I'd love to hear your comments.

Thursday, December 11, 2008

Food Storage: Uses for Tomato Juice

Sleepless in St. George, posted a comment recently about her tomato juice surplus. She doesn't like drinking it, and she has a lot on hand. She must have gotten it free after coupons, LOL! So, on a quest to assist her, I went hunting down recipes using tomato juice. I came up with a lot of weird ways to use tomato juice, from cleaning coins to cleaning skunk musk off of dogs as well as some great recipes.
  1. Use it as the sauce base for spaghetti sauce, pizza sauce or any casserole using tomato paste, sauce, diced tomatoes, etc. If you want to thicken it up first, just simmer it in a saucepan along with your seasonings.
  2. 2-bean Chili: this recipe comes from Campbell's, The thing I think is great about this recipe is that it uses 3 c. of tomato juice!
  3. A delicious chocolate cake could be made using tomato juice. Again, this recipe comes from Campbell's.
  4. Use it when cooking pot roast. I don't serve pot roast often, but when I do, my favorite recipe is from "The Good Housekeeping Illustrated Cookbook". The recipe is called "Country Pot Roast", and it calls for a cup of tomato juice. My family loves it!
  5. Make your own BBQ sauce with it. I would put chicken legs and thighs in a crock pot and add your own BBQ sauce made with tomato juice. This came from About.com. Use 1 1/2 c. to 2 c. tomato juice instead of the sauce and paste.
BBQ Sauce

Prep Time: 10 minutes
Cook Time: 20 minutes

Ingredients:

1 8 ounce can tomato sauce
1 6 ounce can tomato paste
2 tablespoons brown sugar
2 tablespoons vinegar
2 tablespoons olive oil
3 cloves garlic crushed
4 tablespoons minced onion
1 tablespoon Worcestershire sauce
1 teaspoon dry mustard
1 teaspoon cayenne
fresh ground pepper to taste

Preparation:  Cook minced onion and garlic in olive oil until onions turns opaque. Add remaining ingredients, mix thoroughly and allow to simmer for about 20 minutes. Makes about 1 1/2 cups of barbecue sauce.

Potato Pancakes using instant potatoes

I finally had the perfect opportunity to make potato cakes tonight, using instant potatoes. My son brought a friend home from school today. It was nearly dinner time, so I invited the friend for dinner. He said he just got a new retainer and that he needed only soft food. I'm thinking that potato pancakes were just the ticket!

I was taking pictures as I cooked for the family, so I wasn't as organized as usual. I'm just warning you!

The potato cakes recipe is at this link.

Begin with about 2 cups pre-made instant potatoes. Tip # 1...make sure they are thick.
Add 1/4 c. flour and stir.

Add 2 eggs and stir. You'll notice that my potatoes aren't very thick. This was a problem when it came time to flip the cake on the griddle. I'm thinking that leftover potatoes would be better because they would be thicker with less moisture in them. Also, if you separate the eggs, just add the yolks initially, then whip the whites and fold them in at the end, it would make more of a souffle type potato pancake.


I had cooked up a package of bacon earlier in the week. I had a bunch I got for free after coupons, and I need to use it up and make room in my freezer. So, I chopped up about 3 strips of bacon.


Stir in the bacon.....


I added about 1/2 c. grated cheddar cheese.


I love Lawry's garlic powder....so I added about 1 tsp, along with some pepper. I didn't add salt because I figured there was plenty in the bacon, cheese and instant potatoes. Add salt at your own risk!

Heat up your griddle or frying pan. I love my cast iron griddle.


I literally poured my pancakes onto the griddle. I tried to add more potato pearls to make it thicker. It is really better to have thick potatoes to begin with.


Flipping these is a bit difficult if they are thin. Again, using leftover mashed potatoes or instant mashed potatoes is the key to a nice pancake.


I served these with chicken breast strips and mandarin oranges in a cup. The guys garnished these with ketchup and really liked them. They each ate 3 of the pancakes along with the chicken and fruit. The recipe made about 10 potato pancakes. Let me know if you make them and how you liked them.

Monday, December 8, 2008

Food Storage: Using Instant Mashed Potatoes


Trish asked me how she could go about using some of the instant potatoes she had in her food storage. Like Trish, I really don't like instant potatoes (my family doesn't like them either), yet I have some in my food storage. I am trying to use them up gradually. They don't have a 30 year shelf life like grains (stored in #10 cans with an oxypack), and I am just not into processed foods. My first thought about how to use them was as simple as combining them with regular mashed potatoes; using them as an extender. They could be used to make a cream of potato soup.

I have made tortillas using instant mashed potatoes. Anyway, I thought it would be a good idea to do a search on using instant mashed potatoes and here is what I found!
Over at recipeczar, I found a recipe for leftover mashed potato pancakes that I'll be trying soon. I think that I can fry up some of the bacon I have in the freezer, crumble it, and add it to the recipe. These could be served with eggs for breakfast. I'll give those a try on Saturday morning. Thinking about mashed potato pancakes, I remember my grandmother making them!
I love Salmon Patties, and I found a recipe at the frugal life for these using mashed potatoes. By the way, it isn't a bad idea to have a few cans of salmon in your food storage!
Bread or rolls using mashed potatoes are a great way to use your food storage potatoes. They make a nice dinner roll. In my old, red Betty Crocker's Cook Book, there is a recipe that is good. I also found another recipe at the frugal life.
To finish off your mashed potato meal (really, don't serve all of this at one meal...I'm just kidding!), you could serve a chocolate cake that uses mashed potatoes.
I will be trying a few of these recipes this week, and will post what I make. Let me know if you try one of these recipes and how it turned out. Or perhaps you have a great recipe that you'd like to share. Let me know!

Saturday, December 6, 2008

Saucy Beef, Black Bean and Corn Burritos

Here is the yummy grub I made in the previous post. I wanted to show you how you can get two different meals from this. If you have any of this leftover, and you want another way to use it, keep reading!

Using burrito size tortillas, cut foil pieces larger than the tortilla and place the tortilla in the middle of the foil.

Put one scoop or ladle of mixture into the center of the tortilla.


Roll up the tortilla, first tucking the bottom up, then rolling. I leave the top open.


Wrap the foil around the burrito. After that, place in the freezer until you want to use them. I usually just take the foil off and put the burrito on a microwave safe dish, cover with waxed paper and microwave for 2 minutes on high if frozen.


My sons love burritos and it is a good way to not have leftovers! Enjoy!

Saucy Beef, Black Beans and Corn

In the previous post, I showed you how to make soup base out of some leftovers from the refrigerator. Now that you have disguised the leftovers, you can use them without any hassle from your family, hahaha!

Before we get to the soup base, here is a picture of one of my favorite kitchen tools. It is from pampered chef (no, I am not a dealer, lol). I don't know what they call it, but it is for cooking/breaking up ground beef while cooking it. I love this thing!


So, into my large frying pan goes a pound of ground beef. Cook it up and instead of using a spatula, use the pampered chef tool. You'll love it, I promise!


While that is cooking, dice up an onion (glad I saved it and didn't use it in my soup base earlier!). This is another favorite kitchen tool. I am not kidding, I must use this dicer thing 3 times a week.

Dump the diced onions into the browning ground beef. Once beef is cooked and onions are translucent, you can go to the next step.


Add the following ingredients:


1 can black beans, drained

1 can corn, drained

1 can rotelle diced tomatoes with green chilies

1 small can diced green chilies

1 can Campbell's Fiesta Nacho Cheese soup

1 c. of leftover cream soup base (from my previous post)


Add all ingredients, stir and simmer on low-medium until cooked through. I cooked up some cornbread at the same time and served it over the cornbread for a delicious meal. Perfect with a tall glass of milk. Just to let you know, you can substitute the tomatoes for whatever you have on hand. Plain diced tomatoes will work just fine.


If you were at all concerned about how you would use that soup base, you can see that it is easy to tuck it into a saucy recipe. Use it in casseroles, stews, soups.


This is just one way to use this up. If you have any of this left over, then see my next post where I am using the extra to make burritos!

Sunday, November 30, 2008

Sprout Burgers

This is a yummy recipe, which you will want to make all of the time! So, you'll need to have sprouts on hand from the health food store, or start sprouting your own.

First, you need to begin with 3 cups of sprouts. Use sturdy sprouts such as lentils, adzuki, mung, sunflower, garbanzo, etc. If you have alfalfa or broccoli sprouts, save those for garnishing the sandwich.

Assemble your ingredients:

3 c. sprouts
2 eggs
1/2 c. flour (I used whole wheat)
1/4 c. milk
2-3 green onions, chopped
2 cloves garlic, minced
1 tsp dried thyme
salt and pepper to taste

Mix the flour, eggs, and milk in a bowl. I just now noticed that I forgot one egg and my "batter" was a little thick...it still turned out just fine.

After measuring the sprouts, chop them using a chopping knife or put them into a food processor. You don't want a puree, but rather a fine chopped product.

Mix the sprouts into the batter until the ingredients are well blended.
Drop large spoonfuls onto a heated griddle. I put a little olive oil on first, then heat it up. Cook on each side until browned.

I like to serve these on buns with mayonnaise, tomato slices and broccoli sprouts. Today I toasted up some honey bran whole wheat bread that I baked yesterday. I got the recipe at Foodie Farm Girl; It made for a great Sunday evening meal.


Sprout Burgers
adapted from sprout people

3 c. sprouts
2 eggs
1/2 c. flour (I used whole wheat)
1/4 c. milk
2-3 green onions, chopped
2 cloves garlic, minced
1 tsp dried thyme
salt and pepper to taste

Mix flour, eggs and milk in a medium-large bowl until ingredients incorporated. Chop sprouts (or use food processor and pulse until medium chop consistency), green onions and mince garlic cloves. Mix all ingredients together. Spoon "batter" onto hot, oiled griddle or frying pan. Fry on each side until golden brown. Serve on bun, garnish with tomato and broccoli or alfalfa sprouts.

Thursday, November 27, 2008

Sprouts: second progress report

Happy Thanksgiving! Today, before getting into today's food preparation, I wanted to show how the sprouts are doing. I am going to put them in refrigerator where they will last for about a week (that's if I didn't have plans for them..hahaha!). I am going to let the broccoli sprouts sit in the window uncovered for a few hours to green them up a bit. Below are the broccoli sprouts.

Here is a picture of the lentil sprouts. I could have put these in the refrigerator yesterday before they got leaves. But, they are just fine for the sprout burgers I'll be making tomorrow.

The adzuki bean sprouts are still covered and on the counter. Stay tuned for my yummy sprout burger recipe that I'll post tomorrow.

Tuesday, November 25, 2008

Sprouts: a progress report

A lot of people have been asking me about sprouting, so I thought I'd share what I know about sprouts. I've been doing sprouts now for many years. They are really great in a salad or on a sandwich. They are so nutritious and very tasty! I have a recipe for a wonderful sprout burger that I'll share with you by the end of the week. But, for now, I just wanted to show you how my sprouts are doing. I soak a couple of tablespoons worth of sprouting seed in a custard cup over night, then pour the seeds into a sprouting tray. I lightly rinse the sprouts a couple of times a day. They need the moisture to continue sprouting.

This first picture is of adzuki bean sprouts. If you click on the picture, so can see the beans just beginning to sprout.

These are lentil sprouts, and they are really starting to take off! The tray that you see just barely on the left is full of broccoli sprouts.

So, make sure you check back often for the continuing daytime drama of how the beans sprouted! They will be on the chopping block soon ......to be continued!

Awesome bread making blog!


I came across a wonderful blog yesterday. I wanted to make some bread using up some of my huge stash of oats. I was pleasantly surprise to find the blog of Farmgirl Fare! Her oatmeal toasting bread is just plain wonderful! I was so pleased that I had all of the ingredients on hand to make this bread in the first place. I do use a Bosch mixer, so I did eliminate the first rising of the dough.

I am going to make her recipe for Honey Bran Whole Wheat Sandwich bread next. I just need to pick up some wheat bran today while I'm out.

Anyway, I had 3 loaves of bread last night, and only have part of one loaf left...yep, it is that good! Don't worry, we didn't stuff ourselves silly......well, one loaf is gone...hmmmmm. I did send a loaf home with my adult sons. This is a nice, dense loaf of bread....no airy stuff here! Go check out her blog, and leave her a comment.

Thursday, November 20, 2008

Black Bean Corn Salsa from your food storage

Having great recipes is the best way to use items from your food storage. My feeling is that when you have fresh ingredients available to add to your storage items, family members get used to eating those items. If and when the fresh ingredients aren't available, you can still use the basic recipe, excluding the fresh, and your family will still eat the dish. Black Bean Corn Salsa is a recipe that allows you to be flexible in the ingredients you add. Here are the basic ingredients to this really yummy recipe:

1 can black beans, drained, rinsed and drained again
1 can corn, drained
1 package Good Seasonings Italian Dressing
Canola Oil
Vinegar
2 avocado, chopped
2 tomatoes, chopped
1/2 bunch green onions, chopped
cilantro, 1/2 bunch, chopped
Mix all ingredients together and make up the Italian dressing according to package directions, and pour over the salsa. Gently mix together. Chill for an hour if you can.

I put the food storage items first on the ingredient list. These are the backbone to the recipe. The fresh ingredients are negotiable. For example, I found the avocados on sale at my local Smith's, I only had one tomato on hand and I used 1/2 bunch green onions. I didn't have any cilantro on hand. You could chop up celery or red bell pepper and add it to the mix. If you had nothing else, you could add drained, canned diced tomatoes.

This is delicious as a side dish (serve it with chicken and rice, or BBQ beef and another salad) or you will have it all gone if you serve it with corn chips. You will love this recipe because it is really delicious, but it is also very versatile. I hope that you'll try it and post a comment!

Wednesday, November 19, 2008

Bok Choy Smoothie using my Vita Mix

This week I am not following my breakfast menus at all! It's OK though, because cold and hot cereal are not going to go bad in my pantry! I am loving my morning smoothie creations. Yesterday I was at Costco picking up a few items, and a woman was doing a Vita mix demo. Of course, she had the new, more bells and whistles Vita mix. Price of a new one was $389, or something very close to that. I've had my Vita mix for about 20 years, and it is still blending away! Can I just say, that if you have that kind of money to spend right now, it is a fantastic investment. Anyway, she got me in the mood to experiment more with my Vita mix creations.

I took a look into the produce drawer of the refrigerator this morning and found a bag of baby bok choy I had purchased at the Farmer's Market. Hmmmm....OK...what the heck, thought I'd give it a go. To that I added some Italian parsley, a pear and 1/4 c. organic red seedless grapes.
Once all of that was in the blender, I added a 12 oz glass filled with ice and 1/2 c. lemonade. Blended it for about 1 minute.

Spinach is always a good choice for the smoothies as it really has no taste when raw. The bok choy has an earthy taste to it, but you know, it was really very good! I have now gotten in 3-4 servings of fruits and vegetables this morning which includes the highly nutritious leafy greens! Total calorie count is about 250 calories. Yield is about 2 cups.


I'm full now because I drank the entire 2 cups. Well, it is only 250 calories....I'm just saying....

Tuesday, November 18, 2008

Preparing Spaghetti Squash

Preparing spaghetti squash is a relatively easy. The most difficult part of getting it cooked is cutting into it. I used a short, sharp knife to puncture a hole in it, then get a bigger knife to cut it in half.

Here it is cut in half. It doesn't matter if you have jagged edges...you just need it in two pieces.

The next step is to scoop out the seeds and strings, just like you would a pumpkin. I find that a metal melon ball scoop and my metal ice cream scoop clean the squash out great.

Then, put both halves into a pot of boiling water. I have a pot with a steaming basket, which works great. You can also put both pieces, cut side down in a 9x13 baking dish and bake in the oven for 30 minutes at about 350*. You can also do this in the microwave for about 15 minutes with cut sides down in some water. I prefer to steam it. It cooks in about 10-15 minutes.

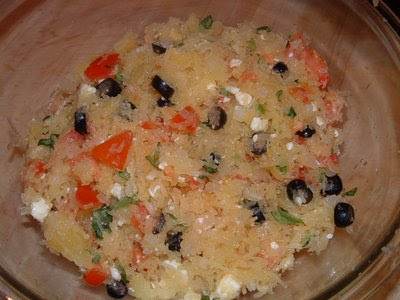
While the squash is cooking, prepare your sauce. You can serve this with a tomato sauce or marinara sauce. I have a great recipe I found on http://www.allrecipes.com/ for spaghetti squash with diced tomatoes and feta cheese that is yummy. First, saute and onion and garlic clove in some olive oil. Saute until onions are translucent.

Add a couple of diced tomatoes, just until the tomatoes are heated through.

In a large bowl, add a small can of slice olives and 2 TBSP of chopped fresh basil.

I got this feta cheese at the farmer's market. It is made from raw milk, and is really delicious. You will need 3/4 c. crumbled feta cheese.

Add the crumbled feta cheese to the bowl. It's looking good, isn't it!

Once the squash is cooked (it is fork tender) use a fork and scrape the inside of the squash to pull of the strands of squash. This will look like threads as you are scraping it out. Click on the picture to see it up close.
Add the onion/tomato mixture to the bowl, along with the squash. Mix it all together. Serve this warm. Serves 6.
I hope that you'll try spaghetti squash, even if you try it with a tomato sauce. It is nutritious and a great side dish if you're looking to include more vegetables in your diet. It is a wonderful main dish if you are looking for a vegetarian option.