Friday, February 8, 2013

Pressure Canning Beans


Canned pinto beans
In January, I was busy with my pressure canner, bottling beans. I bottled pinto beans and black beans. I still have the canner on my stove top, and plan to bottle some carrots today or tomorrow. It is nice to have beans on hand. It is so economical to bottle your own. I store beans in #10 cans in my food storage pantry, which I get from my local LDS (The Church of Jesus Christ of Latter-day Saints) cannery. You can get information on how to order here. I get 25# of beans, and then put them into #10 cans. Pinto beans cost me about $0.74/pound. When you include the cost of the can, lid and oxy pack, the cost is closer to $1/pound. However, I can store the beans for at least 5-6 years, and they cook up great.


For Christmas, "Santa" bought me a Cuisinart Electric Pressure Cooker. This is such a great tool for cooking beans. I have a stove top pressure cooker, a Fagor to be exact. That being said, I love being able to set the electric pressure cooker and walk away to do other things. I can saute some diced onion in the Cuisinart first, add the beans and water, then set it to cook. The beans come out perfect!

I always soak my beans overnight, or for 8 hours before cooking them. Beans are pretty dirty, so rinsing and soaking are a must. After cooking them, I bottle them up with the hot fluid in the pot, and pressure can them. I have an All American 921 and love it. Check the Ball Blue Book for times and PSI.

Another method for bottling beans is to rinse and soak the beans overnight. Put them into the canning bottles, and pour boiling water over the beans to the 1" mark. Wipe the rims, put the lid on and hand tighten the ring.


Friday, December 14, 2012

Last Tomato Harvest of 2012

Cherry Tomato Harvest Dec. 7, 2012

Sorry for the picture quality on the tomatoes above....used my cell phone and it was nightfall so the lighting wasn't great. But, on the positive side, I still have tomatoes fresh from my garden. I harvested the remaining tomatoes last Friday (Dec. 7th). I had to protect the tomatoes from frost in November once or twice, but I'm glad I made the effort.

I grouped the tomatoes according to ripeness, using the ripe ones to make fresh salsa to serve with dinner. Yes, it was delicious!

The green tomatoes from last week are now turning red. I think I'll have enough cherry tomatoes to last me through the week.

I'm already starting to think about tomatoes that I'm planting in 2013! I had a horrible problem with tomato horn worms, so I am definitely going to use some kind of organic treatment on my plants this year. The horn worms were getting more tomatoes than I was at one point in the season!

I still have parsley, chives, mint, Swiss Chard and carrots growing in my pots. It's been raining today, so they are all getting some water.

Are you still harvesting produce from your garden? If so, I'd love to hear what you have on hand!

Friday, October 5, 2012

Zucchini Pizzas with Basil


I was able to buy a round zucchini at the local farmer's market. A friend had told me that she was going to grill pizzas from the one she got, so I thought I'd give it a go as well. In case you haven't seen a round zucchini, they look like this:


....kind of like a pumpkin, but green! So fun and so many possibilities in cooking with them.

First, I cut slices about 1/2" thick. I coated each side with a little Extra Virgin Olive Oil so that when I put them on the grill, they wouldn't stick. Unfortunately, my zucchini pizzas didn't make it on the BBQ (starter wasn't working and I couldn't get the dang thing lit). I used my George Forman to cook the already coated-with-EVOO zucchini discs. Four to five minutes was all that was needed. I then put them on a cookie sheet, smeared a little pasta sauce on them, sprinkled with grated mozzarella cheese, and then baked them at 350* for about 10 minutes until the cheese melted. After cutting some fresh basil from my garden, I sliced it up and sprinkled it on the baked "pizzas."
 

I served these with a large salad with plenty of greens and sprouts, and some rolls. Delicious!

Thursday, October 4, 2012

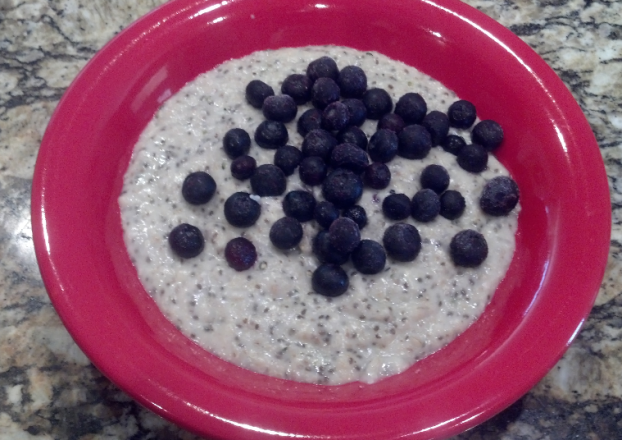
Oatmeal with Chia and Blueberries


One of my favorite breakfasts is hot cereal with chia. I usually add some organic blueberries or cherries (you can get them frozen at Costco).  I use a Marga Flaker to turn my oat groats into flaked oats for quicker cooking.

In the picture above, I combined flaked oat groats, flaked sprouted brown rice and added some oat bran and hemp seed. I use about 1/4c. of this and add 1 c. water to cook. Once the cereal has started to thicken, I add about 1/2 c. of sprouted chia. I keep this in the refrigerator and add to smoothies as well. Simmer on low until cereal is cooked and  mixture is thickened. Add frozen berries and stir into cereal. Top with a little yogurt if desired.


Monday, September 3, 2012

Microgreens a more nutritious vegetable?

http://www.npr.org/blogs/thesalt/2012/08/29/160274163/introducing-microgreens-younger-and-maybe-more-nutritious-vegetables


Great article from NPR's blog, the salt. 

Basically, the article says that current nutrition studies indicate that microgreens may pack more nutrition than other vegetables.

I've got several trays of sunflower greens growing right now. We love them in salads. Delicious!

Tuesday, August 21, 2012

Yellow Squash Chips

Do you have more yellow or zucchini squash than you need? I'm always looking for different ways to use summer squash. Making seasoned chips is an easy way to use up the squash, and have a healthy snack at the same time!
Yellow Squash
After washing the squash, and cutting off the ends, I use a mandolin to cut uniform slices from the squash. When the slices are the same thickness, they dry in the same amount of time.

Mandolin and summer squash slices
Next, arrange the slices on your dehydrator trays. Don't overlap. You want them to dry at about the same time.

Yellow squash slices on dehydrator tray
The next step is to season the soon-to-be-chips with whatever seasoning sounds good to you. I made some with BBQ seasoning, with dill, and the ones pictured below are seasoned with a  Mediterranean blend with salt. A light amount of salt/seasoning is preferred. I would use a little less seasoning on the next batch I make (see picture below).

Dry these at 115* for 5-6 hours until paper thing and breakable. You don't want any flexibility in the chips. They will be crisp and easily broken.
Mediterranean seasoned squash chips
As usual, we ate this finished product before I got the last picture! They were delicious and they went fast! So next time you have a bunch of extra squash, don't leave it on the neighbor's door step and play doorbell ditch! Make yourself these healthy and delicious squash chips. These are best eaten within a couple of days of dehydrating.

Saturday, August 11, 2012

Mung Bean Sprouts

Mung Bean Sprouts from Freshlife Automatic Sprouter

This week I've been harvesting zucchini, tomatoes and Swiss Chard from my garden. I also grew some mung bean sprouts in my Freshlife Automatic Sprouter.

I made spring rolls one night, and a stir fry another night. It's always fun to eat them right from the refrigerator as well!