Friday, December 14, 2012

Last Tomato Harvest of 2012

Cherry Tomato Harvest Dec. 7, 2012

Sorry for the picture quality on the tomatoes above....used my cell phone and it was nightfall so the lighting wasn't great. But, on the positive side, I still have tomatoes fresh from my garden. I harvested the remaining tomatoes last Friday (Dec. 7th). I had to protect the tomatoes from frost in November once or twice, but I'm glad I made the effort.

I grouped the tomatoes according to ripeness, using the ripe ones to make fresh salsa to serve with dinner. Yes, it was delicious!

The green tomatoes from last week are now turning red. I think I'll have enough cherry tomatoes to last me through the week.

I'm already starting to think about tomatoes that I'm planting in 2013! I had a horrible problem with tomato horn worms, so I am definitely going to use some kind of organic treatment on my plants this year. The horn worms were getting more tomatoes than I was at one point in the season!

I still have parsley, chives, mint, Swiss Chard and carrots growing in my pots. It's been raining today, so they are all getting some water.

Are you still harvesting produce from your garden? If so, I'd love to hear what you have on hand!

Friday, October 5, 2012

Zucchini Pizzas with Basil


I was able to buy a round zucchini at the local farmer's market. A friend had told me that she was going to grill pizzas from the one she got, so I thought I'd give it a go as well. In case you haven't seen a round zucchini, they look like this:


....kind of like a pumpkin, but green! So fun and so many possibilities in cooking with them.

First, I cut slices about 1/2" thick. I coated each side with a little Extra Virgin Olive Oil so that when I put them on the grill, they wouldn't stick. Unfortunately, my zucchini pizzas didn't make it on the BBQ (starter wasn't working and I couldn't get the dang thing lit). I used my George Forman to cook the already coated-with-EVOO zucchini discs. Four to five minutes was all that was needed. I then put them on a cookie sheet, smeared a little pasta sauce on them, sprinkled with grated mozzarella cheese, and then baked them at 350* for about 10 minutes until the cheese melted. After cutting some fresh basil from my garden, I sliced it up and sprinkled it on the baked "pizzas."
 

I served these with a large salad with plenty of greens and sprouts, and some rolls. Delicious!

Thursday, October 4, 2012

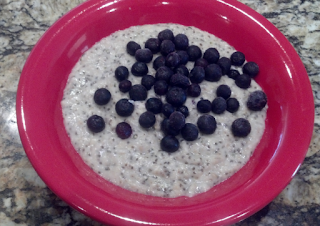
Oatmeal with Chia and Blueberries


One of my favorite breakfasts is hot cereal with chia. I usually add some organic blueberries or cherries (you can get them frozen at Costco).  I use a Marga Flaker to turn my oat groats into flaked oats for quicker cooking.

In the picture above, I combined flaked oat groats, flaked sprouted brown rice and added some oat bran and hemp seed. I use about 1/4c. of this and add 1 c. water to cook. Once the cereal has started to thicken, I add about 1/2 c. of sprouted chia. I keep this in the refrigerator and add to smoothies as well. Simmer on low until cereal is cooked and  mixture is thickened. Add frozen berries and stir into cereal. Top with a little yogurt if desired.


Monday, September 3, 2012

Microgreens a more nutritious vegetable?

http://www.npr.org/blogs/thesalt/2012/08/29/160274163/introducing-microgreens-younger-and-maybe-more-nutritious-vegetables


Great article from NPR's blog, the salt. 

Basically, the article says that current nutrition studies indicate that microgreens may pack more nutrition than other vegetables.

I've got several trays of sunflower greens growing right now. We love them in salads. Delicious!

Tuesday, August 21, 2012

Yellow Squash Chips

Do you have more yellow or zucchini squash than you need? I'm always looking for different ways to use summer squash. Making seasoned chips is an easy way to use up the squash, and have a healthy snack at the same time!
Yellow Squash
After washing the squash, and cutting off the ends, I use a mandolin to cut uniform slices from the squash. When the slices are the same thickness, they dry in the same amount of time.

Mandolin and summer squash slices
Next, arrange the slices on your dehydrator trays. Don't overlap. You want them to dry at about the same time.

Yellow squash slices on dehydrator tray
The next step is to season the soon-to-be-chips with whatever seasoning sounds good to you. I made some with BBQ seasoning, with dill, and the ones pictured below are seasoned with a  Mediterranean blend with salt. A light amount of salt/seasoning is preferred. I would use a little less seasoning on the next batch I make (see picture below).

Dry these at 115* for 5-6 hours until paper thing and breakable. You don't want any flexibility in the chips. They will be crisp and easily broken.
Mediterranean seasoned squash chips
As usual, we ate this finished product before I got the last picture! They were delicious and they went fast! So next time you have a bunch of extra squash, don't leave it on the neighbor's door step and play doorbell ditch! Make yourself these healthy and delicious squash chips. These are best eaten within a couple of days of dehydrating.

Saturday, August 11, 2012

Mung Bean Sprouts

Mung Bean Sprouts from Freshlife Automatic Sprouter

This week I've been harvesting zucchini, tomatoes and Swiss Chard from my garden. I also grew some mung bean sprouts in my Freshlife Automatic Sprouter.

I made spring rolls one night, and a stir fry another night. It's always fun to eat them right from the refrigerator as well!

Saturday, August 4, 2012

Delicata Squash in my Container Garden


Last fall, I was in Las Vegas and stopped by Whole Foods, looking for delicata squash. I was able to purchase some, and we absolutely loved it! I saved the seeds so that I could try my hand at growing it.  I've been somewhat frustrated trying to get it to grow past what you see in the above picture. It is growing in pots, so if I don't get the water just right, the little squashes just shrivel up. Image my happiness when I noticed a huge delicata squash growing!


I've finally picked it, and I'll serve it with dinner tomorrow. I will make a post tomorrow on how to prepare it in a simple, delicious way.

Have you had success growing delicata squash? Post a comment if you have and let me know how successful you've been growing it.

Monday, July 30, 2012

Green Bean, Cucumber and Cherry Tomato Salad


Hopefully, like me, you have plenty of cherry tomatoes growing in your garden. I love eating them just picked from the garden, so it is amazing that any make it back into the kitchen! I'm not growing green beans this year, but I got some locally grown for this recipe.

This salad is a perfect side dish, or can be eaten as a main course. I like to include it as one of several salads for our evening meal.


Green Bean, Cucumber and Cherry Tomato Salad


1-2 cups green beans, blanched and cut into 1-inch pieces
1 pint cherry tomatoes, halved
1 large seedless cucumber, chopped
1/2 c. chopped flat leaf parsley

3 TBSP balsamic vinegar
1 TBSP lemon juice
4 TBSP extra virgin olive oil
salt and pepper to taste

Assemble all vegetables in a bowl. Mix balsamic vinegar, lemon juice, olive oil and salt and pepper into a small bowl and whisk until blended; pour desired amount of dressing over the vegetables.


Thursday, July 26, 2012

Dr. Hyman's UltraBroth Recipe


Dr. Hyman is best known for his book, The Blood Sugar Solution.  I came across a recipe on his website for UltraBroth.  I decided to give this recipe a try, as I had most of the ingredients on hand. I only had to purchase the shitake mushrooms (found them at my local Harmon's).  I have to say that the flavor of the broth is really quite nice. I did strain the broth but used the vegetables up in a stirfry later. What I like about this recipe, other than the fact that it is low in calories, is that it is vegan.

Here is a picture of the broth that I have stored in a quart mason jar. The recipe produced about 2 quarts plus another cup worth of broth.

UltraBroth in Quart Mason Jar

UltraBroth

For every three quarts of water add:

1 large onion, chopped
2 carrots, sliced
1 cup of daikon or white radish root and tops (ideal, but optional)
1 cup of winter squash cut into large cubes
1 cup of root vegetables: turnips, parsnips, and rutabagas for sweetness
2 cups of chopped greens: kale, parsley, beet greens, collard greens, chard, dandelion,
cilantro or other greens
2 celery stalks
½ cup of sea weed: nori, dulse, wakame, kelp, or kombu
½ cup of cabbage
4 ½-inch slices of fresh ginger
2 cloves of whole garlic (not chopped or crushed)
Sea salt, to taste
1 cup fresh or dried shitake or maitake mushrooms (If available; these contain powerful immune boosting properties.)

Add all the ingredients at once and place on a low boil for approximately 60 minutes. It may take a little longer. Simply continue to boil to taste. Cool, strain (throw out the cooked vegetables or blend them into broth using an immersion blender), and store in a large, tightly-sealed glass container in the fridge. Simply heat gently and drink up to 3–4 cups a day.


Nutrition Facts Per Serving:
STRAINED: Cal: 5 Pro: 0 Fat:0 Carbohydrate: 0
BLENDED: Cal: 60 Pro: 0 Fat: 0 Carbohydrate: 14

Sunday, July 22, 2012

My Container Garden July 2012

Unfortunately, I've been remiss in posting these pictures of my container garden. I actually have containers throughout my backyard that I grow vegetables in.


I love how tall the cherry tomato plant has grown. This particular plant came from Costco, and has done very well. At least I've been able to harvest quite a few cherry tomatoes throughout the summer.


On another plant in a different area of the yard, this cherry tomato is suffering. I look all over for the hornworms or caterpillars, and can't find any. Of course, it is in the 90's so it is tough standing in the heat trying to find the culprits.


It is just so easy to grow Swiss Chard, and it is so nutritious! I made a great batch of chili using Giada's White Bean and Chicken Chili recipe. However, I left out the chicken! On purpose of course. It still tastes great! If you do eat meat/poultry, I'd use ground turkey in place of the chicken.

Swiss Chard

Friday, July 20, 2012

Kale Slaw


I had the opportunity to get my hands on a copy of Tana Amen's Cookbook, Change Your Brain, Change Your Body Cookbook.  I came across this recipe for Clever Kale Slaw, and it really tastes great. I have three large containers of Swiss Chard in my garden, and I used the Swiss Chard in place of the Kale in this recipe.

I started out shredding the cabbage (I just used green cabbage) and used a chiffonade technique on the Swiss chard to make it fine enough to resemble the cabbage. Here it is in the bowl, below. Click on the picture to make it bigger.


Next, I grated a carrot into the mix, and added the chopped raw cashews:


For some reason, after that I stopped taking pictures :(.....

So here is the final picture, and I'll add the recipe after that!


Clever Kale Slaw

3 c. shredded kale or Swiss chard
1/2 c. shredded green cabbage
1/2 c. shredded purple cabbage (or use 1 c. prepackaged coleslaw mix)
1/4 c. shredded carrot
1/2 c. chopped raw cashew
1/2 c. Veganaise (or, use mayonnaise or miracle whip)
1 TBSP apple cider vinegar
1/2 tsp allspice
1/8 tsp cinnamon
1/8 tsp nutmeg
1 tsp fresh thyme (or 1/2 tsp dried)
1/3 tsp curry powder
1/4 tsp Real Salt
1/4 tsp pepper
1/4 c. raw sunflower seeds
1/2 c. dried cranberries

Combine kale, cabbage, carrot and nuts. In a small mixing bowl, combine Veganaise, vinegar, and spices. Whisk until mixture is blended well.Toss with salad mix. Allow salad to refrigerate for 30 minutes prior to serving if possible so flavors can "marry." Top with sunflower seeds and dried cranberries.


Thursday, June 14, 2012

Sprouted, Dehydrated Raw Almonds


Sprouted, Dehydrated Raw Almonds are one of the most nutritious snacks around. They have a satisfying "pop" when you crunch into them. Raw almonds that haven't been sprouted just don't have that "pop."

Start by finding some raw, unpasteurized almonds. You can get these from your own trees or from almonds growers directly.  You are not getting unpasteurized almonds at your local health food store or at Costco. They can sell them as raw, but do to government regulations, they have been pasteurized. Since pasteurization kills the living "seed", you can not sprout pasteurized almonds. Look for almond growers at your local farmer's market.

Soak 1 part almonds to 4 parts of water overnight (12 hours). Drain water and rinse soaked almonds.
Put your soaked almonds into a sprouter or mason jar, rinsing 2-3 times during the day. Rinse again and leave to sprout overnight. The almonds will have a tiny bulge at the narrow end. That is the sprout. These are ready to dehydrate or use to make almond milk.

Dehydrate for 12-24 hours at 105*F. This will dry the almonds but they will still be a living plant. I store my sprouted, dehydrated almonds in ziplock bags or mason jars with lids until I am ready to use them.

For almonds milk, use 1 cup of freshly sprouted almonds and 4 cups of water. Blend thoroughly in your vitamix or other blender. Strain in a nut milk bag, squeezing all of the nut milk out. I use a jelly strainer bag. They are inexpensive, and you can buy them online or at your local kitchen center.

Sprouting nuts, seeds and grains is beneficial.  The nutrition makeup changes once the stored energy source (seed, nut or grain) changes to that of a plant (sprout) in its initial stages of growth. The carbohydrate and fat decreases, and the vitamin and mineral content increases.

Friday, June 8, 2012

Today's Harvest: Lettuce, Tomatoes and Swiss Chard

I love going out to the garden every morning to see what is ready to harvest. Pictured below is one of the cherry tomato plants that I got this year at Costco. They are about 3 feet tall now, and the tomatoes have slowly been ripening the past 2 weeks.

Cherry Tomato Plant in container
Today I was really pleased to be able to harvest some lettuce (black seeded Simpson lettuce). Those plants just keep on giving! I've been harvesting some every week.

Black Seeded Simpson Lettuce
I washed it all and gave it a spin in my salad spinner. I had enough to fill a gallon ziplock bag.
Isn't it beautiful? It will be perfect for green smoothies (this variety has a sweet taste) and for salads. Next, I took the scissors to a pot of Swiss chard.....

Swiss Chard growing in a pot
After cutting off the stems (I use the stems in smoothies and stirfry), I washed it and spun it dry (lettuce spinner, again!) and had enough to fill a gallon size ziplock bag. There is such a feeling of satisfaction being able to harvest product from your own garden. I grow everything organically; no pesticides.
Swiss Chard
OK, and then on to my mini harvest of tomatoes...

Red Cherry and Yellow Pear Tomatoes
Don't these look delicious! I remember the first time I picked a cherry tomato. It was in our neighbor's garden in Escondido, California. I was 4 or 5 years old, and our neighbor let us come over and pick some to snack on. I will never forget how good those cherry tomatoes tasted. My lifelong love of gardening started right then! Anyway, there is nothing better than popping a cherry tomato fresh off of the plant into your mouth. Heaven! I did just that while picking these and I can say that these are fantastic.
I also have some sprouts growing. I usually have 3-4 different sprouts going on the counter every week. This week I sprouted lentils, peas, garbanzos and broccoli. Here is a picture of the broccoli sprouts....

We've been eating sprouts at every meal this week. Great taste, nutritious and a perfect addition to whatever we're eating. This particular broccoli seed has been some of the best I've ever sprouted. You can order some at  www.sproutshop.net .  Click here for the broccoli seed page.

Tuesday, May 22, 2012

Today's Harvest: Beets

Today's Harvest is beets! May 22, 2012

The beets that I thinned awhile back are ready for harvesting. The thinnings that I planted are still a ways off. So, now I get to decide what to do with these beets. I guess I could bottle them, or slice them with my mandolin, and bake them for beet chips. I've been cleaning and organizing today, and saw Rachael Ray make a salad with some sliced beets. Think I'll do some googling and see what else I can come up with! When I've decided, I'll be back with the results!

Beets (right) growing in one of my large pots

Thursday, May 17, 2012

Pug in the Garden


Today pug got his summer haircut. About 3 times a year we have Pug shaved. It is good for him during the summer because it keeps him cool. Pugs overheat fairly easily. We love to hold him and snuggle with him after he is shaved because he is so smooth and soft! I also love that there is a whole lot less hair in the house.


Here is Luigi greeting Pug after his grooming session with the Dog Mobile!


One of my cherry tomato plants in really getting big.


Close up of some of the tomatoes on the plant.


The yellow pear tomatoes are really coming on and getting big.


And finally, the celebrity tomatoes.

Tomorrow, I'll try to get a chance to load some of the pictures I took of the the herbs and other plants.

Wednesday, May 16, 2012

How to Make the Perfect Green Smoothie


General Guidelines for Making Green Smoothies

Green smoothies are a great way to get more fruits and vegetables in your diet.  Experiment with ingredients to find your favorite smoothie!


·         STEP ONE:  cover the blades of your Vitamix or blender with liquid. This can be water or juice. It will help the blending process.


·         STEP TWO: Add fruit. Green grapes, pears, apples/applesauce or juice of any of these are sweeteners. Bananas, pumpkin, peaches, etc. can be used as thickeners. This is a good time to add yogurt if you are including it.


·         STEP THREE: Add any supplements, like chia, while blender is on and mixing, and before you add the greens. It seems to get incorporated into the mix better this way.


·         STEP FOUR: Add greens. Spinach is mildest, followed by Napa cabbage, bok choy and young Swiss Chard. Full grown Swiss Chard and Kale have a more noticeable taste as does celery.


·         ADD ICE: Ice gives your smoothie a nice texture after blending, and is very refreshing. You can add frozen fruit at the end instead of ice for the same effect. I like adding frozen strawberries or blueberries.

Vegetable Class at Dixie State College


Tonight is my first class of teaching vegetable cooking/preparation through Dixie State College Community Education.  You can find the brochure for summer classes here.  I'm looking forward to the class. I'm be covering all of the various ways of including vegetables in the diet, from smoothies to salads and sandwiches to cooked vegetables. Loading up my car for the class is going to take some effort. My refrigerator is chuck full of vegetables right now. I'm almost afraid to open it! I'll take some pictures during the class and post them this week.

The picture of the red pepper is a tribute to the Red Pepper Soup Recipe that I'll be making tonight. You can find my original post on that recipe here.

Tuesday, May 8, 2012

Today's Harvest: Lettuce


I've been enjoying lettuce (Simpson Black Seeded Leaf Lettuce), Swiss chard and beet greens from my garden over the last several weeks. Above, I cut enough to fill a heaping amount that came way over the top of my large Tupperware mixing bowl.


Leaf lettuces are considered greens. They are a good source of vitamin A and C, calcium and fiber as well as essential minerals such as potassium. Here I am chopping up some washed lettuce for a salad. I also will add some of the Simpson Black Seeded Leaf Lettuce to smoothies. It has a sweet taste.


After washing the lettuce, I like to use the lettuce spinner to remove any extra moisture before cutting it up for a salad.


After washing and spinning the lettuce leaves, I store whatever I'm not using in a dish towel, and then placed in a air tight plastic container. The leaves are then ready to go when ever I am ready to chop them up for a salad, or put them into a smoothie. They will stay good for 10-14 days this way.

Monday, May 7, 2012


MICROGREENS

Note: This is a guest post by www.sproutshop.net on how to grow microgreens.


  Picture courtesy of Sunset Magazine

Microgreens are a relatively recent addition to the produce aisle. These tiny seedlings are harvested when the first true leaves appear (after the cotyledon or seed leaf stage). They are a specialty crop which many chefs like to use to garnish their dishes or add to salads. Microgreens add color, flavor and texture to any dish. In addition, they are a nutrient dense food, meaning that they provide a significant amount of nutrients compared to the calories in the food. According to the University of Florida IFAS Extension, Sprouts, microgreens and baby greens are simply greens harvested and consumed in an immature state.

·         Sprouts the youngest/smallest, are germinated seed which is sprouted, and are consumed whole. Are ready to eat in 2-6 days after soaking.

·         Microgreens slightly older/larger (about 2-3” tall). Are ready to eat within a week of planting. Some varieties take longer. They are cut at the soil level at harvest.

·         Baby Greens or Petite Greens the oldest/largest (3-4” tall). Are usually ready to eat in 1-2 weeks. They are cut at the soil level at harvest.


Baby lettuce greens grown by  www.sproutshop.net 

Growing microgreens or baby greens can be grown in a garden, or on a kitchen counter or covered patio table (weather permitting). This is a great way to have a year round garden!


Here’s what you’ll need to grow microgreens:

·         Seedling Trays, recycled plastic trays or short pots

Seedling trays are best, but there is nothing wrong with using plastic trays that used to contain some sort of produce you bought. These don’t need to have holes in the bottom, as long as you don’t over water.

·         Organic potting mix, vermiculite and worm castings

Using organic potting mix is best. It doesn’t hurt to add some vermiculite to the mix, as it makes for better soil drainage. Some growers swear by adding worm castings to the mix. You can purchase these from garden centers.

·         Spray Water Bottle or water bottle with small pull up spout

Spray your seeds to keep moist until they sprout, and keep emerging plants from drying out while growing.


How to start your microgreens:

1.    Fill seed tray with good quality, nutrient rich potting soil. Lightly compact soil (using a tamping device or the back of a spoon) to create an even surface. Do not  compact the soil or you will not get good growing results

2.    TIP: Be sure not to overfill the soil or you will have a mess on your hands when you water. Leave ½” space from the soil line to the top of your container.

Microgreens kit with radish seed – www.sproutshop.net
  

3.    Add seeds. Sprinkle high quality seeds over your soil, evenly. You can plant densely, or sparsely, depending on your preference.

4.    Press the seeds lightly into the soil without pressing them under the soil. Use a tamping tool or the back of a spoon. This will help the seeds to set roots.

5.    Cover the seeds with soil or paper towel. Soil is best for large seeds. Sprinkle soil over the seeds to keep them covered and moist after watering. For small seeds, use the paper towel by gently placing towel over the entire surface.

6.    Water. Use plenty of water but apply it in a gentle way to not disrupt the seeds. The seeds should not be in standing water, but should be moist.

7.    Cover Tray using the clear plastic dome that comes with your tray. It will keep your seeds warm and moist; kind of like a mini greenhouse!

8.    Germinate seeds by keeping soil/paper towel covering seeds moist. Seeds will push up the towel or soil. You can remove the paper towel once the seeds begin to push up the towel.  Consider using a spray bottle to mist the seeds/soil at this point, or a water bottle with a pop-up drinking cap to gently squeeze water onto germinated seeds. TIP: small seeds may have fuzz, which can look like mold, but is normal for many seed varieties.

Sunflower seeds beginning to grow in seedling tray
9.    Put in a location with indirect sunlight or under a grow light once growth is established. You can remove the cover at this point as well. Do not put your microgreens in the sun with the cover on or they will overheat die.

10. Harvest and Eat!

You can decide at what point you want to cut your microgreens and eat them. Cut a few once they are a couple of inches high and see how you like the taste. Sunflower greens should be cut before they reach the true leaf stage (before another set of leaves appears in the center of the first leaves) or they might taste bitter. Use clean, sharp kitchen scissors to harvest your microgreens. After harvesting, your greens will keep for 7-10 days in the refrigerator in an airtight container.


Sunflower microgreens, cut and washed